
Swapping out the Center Section.
if your Main spar has a problem, you'll need to take it out. Here is how:
1.The first thing to do is remove the interior and take inventory of where everything goes. Take pictures of everything and tag all flight control cables and tubes. Whenever you remove a part, try to keep the fasteners and hardware with it.
Make note of your custom setup - e.g. rudder control.
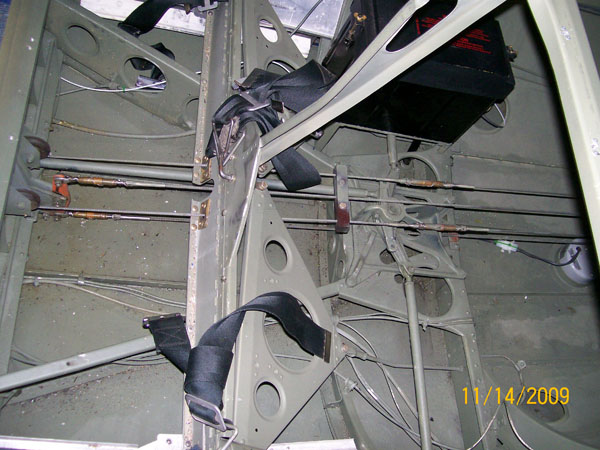
This shows where the control cables go through the seat back with removable fairleads.
2.You will need to drill out all rivets on the belly skin using a size 40 or 30 drill bit. It is best to punch the head of the rivet to keep the bit from slipping, then use a drill bit the same diameter as the rivet shank. Drill the center of the rivet head until the head snaps off (it may thread itself onto the bit-- that's OK). Then use a small punch on the shank to knock the rivet out. Try to avoid going all the way through the shank so you don't wing up with an enlarged or double hole in the center section. If you do, you may need to use a larger diameter rivet or a doubler. Note that there are two straight angle extrusions that run lengthwise along the belly skin. All rivets around the perimeter of the belly skin and along the diagonal web must be removed. If you are not replacing the belly skin, it may be possible to leave them riveted to the skin and just drill out the rivets where they attach to the main spar and rear spar assembly.


3.You will need to drill out the rivets holding the lower window track in place. The Control Mast will have to be removed from the center section. This may be tricky, since the Parts Manual specifies the use of drilled AN bolts with castellated nuts and cotter pins. The bolts should be installed from the top so getting to the cotter pins will be difficult.


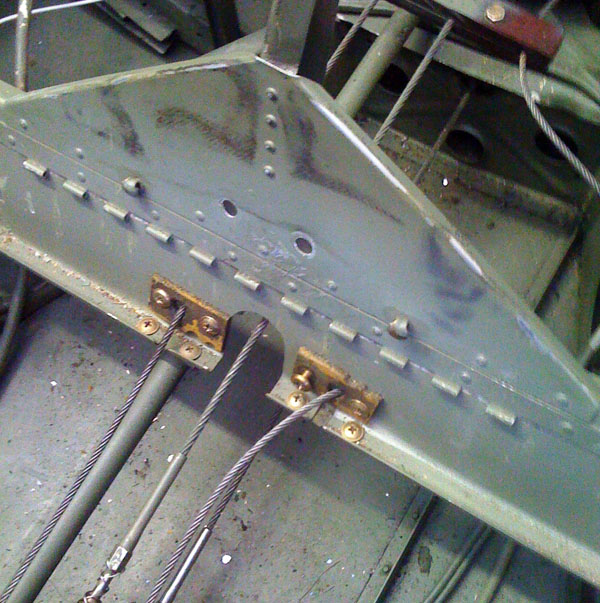
4. After removing the battery box, you will find that the battery tray is actually two pieces. One attaches to the bulkhead and one attaches to the aft spar. Drill out the rivets for both using a #30 bit and remove the two sections of the battery tray.

5. These brackets mount to the lower skin in front of the main spar. They are difficult to remove and re-install. They attached to my main spar with a combination of screws and rivets. You can leave them in place in the fuselage and remove them from the lower main spar. You will need to lower the back of the center section (rear spar) first then slide the center section back until the main spar clears them when you remove the center section from the fuselage.

6. You will need to remove the fuel tanks and forward wing fillets that attach to the fuselage with screws. Then, you will need to drill out the rivets that secure the mid-wing fillets to the upper skin of the center section using a #40 or #30 drill bit and punch as previously described

7. Disconnect and remove the aileron control rod from the control mast and the forward control quadrant. Disconnect and remove the left and right aileron pushrods from the control mast and the aileron bell cranks on the outboard of the center section. Disconnect and remove the elevator pushrod from the forward control quadrant and elevator bellcrank mounted on the back of the main spar. Separate the elevator and rudder cables at the turnbuckles, label them and get them out of the way. Unbolt and remove the elevator bellcrank from the center section. Find the cotter pins on the control mast under the mounting plate on the center section, remove them, then unbolt and remove the control mast. Note that the pictures show an installation for a 415 with rudder pedals, so yours may appear different if you don't have pedals.
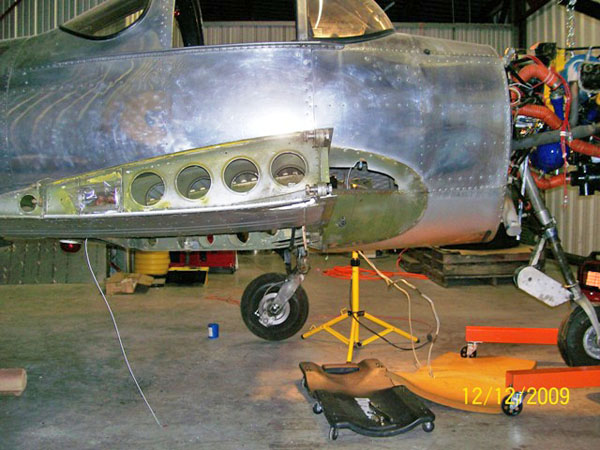
8.Remove the fairing panels covering the gap between the center section and outer wing. These are normally attached with simple PK screws. Remove the control tubes connecting the ailerons to the aileron bellcrank in the center section. Disconnect the electrical connections for the wingtip position lights and landing lights on each wing. Disconnect the pitot-static lines from the wings to the center section. Outer Wings are attached by four bolts on each side. Two large close-tolerance bolts attach the wings to the center section through eyes on the main spar. Two smaller AN bolts attach the wing to the aft spar. Both bolts use castellated nuts and cotter pins. Remove the forward upper bolt last. Support the wing as you do this, then gently rock the wing up and down until it comes free. You will need at least two people to do this. Move the wings to a safe place for storage until you are ready to re-install them.

9.Remove the aluminum fairings from the main landing gear legs. Drain the brake system. Remove the brake lines that go along the front of the main spar. Reach inside the center section using one of the lightening holes (or one of the lower inspection holes if you modified the lower skins per SB-32) and remove the brake line from each landing gear that attaches to the fitting on the main spar. The landing gear attach to the front of the main spar using special close-tolerance bolts and self-locking nuts. You will be removing these once you elevate the aircraft.
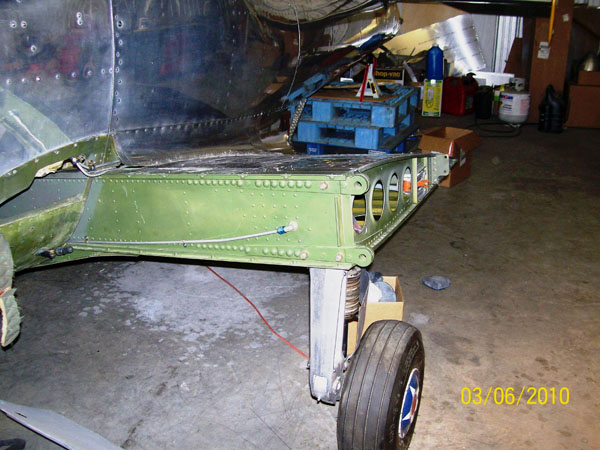
You may find that the lower skin behind the gear legs is damaged from contact. You will want to address this by enlarging the opening on your new skins to prevent cracking before installing the new center section.

10. After all rivets are drilled out, the center section is held to the fuselage by four close-tolerance hex-cap bolts on each side at the main spar cap and a single AN bolt on each side attached to an angle bracket on the aft spar. The four forward bolts attach to Bulkhead C can be accessed through the fuel tank opening in the fuselage. They are difficult to reach due to the angle formed between the bulkhead, main spar cap, and fuselage skin. Loosen the self-locking nuts from these bolts before elevating the airplane to facilitate easier removal. Likewise, loosen, but do not remove, the bolts on the aft spar.


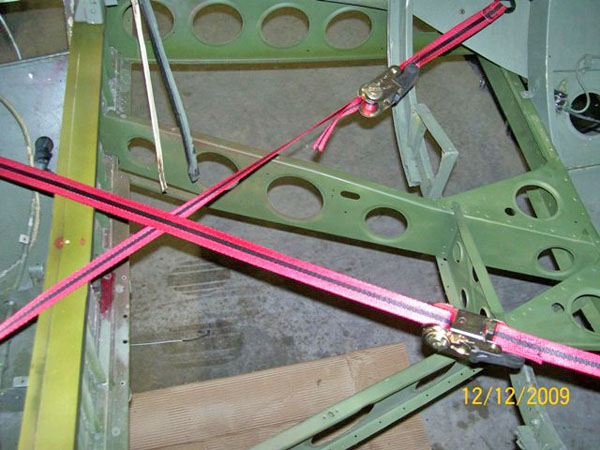
11.Once everything has been removed, all the rivets are drilled out, belly skins are removed, and bolts are loosened, it's time to elevate the airplane. I used cargo straps attached to eye bolts and criss-crossed between the C and E bulkheads to ensure the fuselage would not spread when the center section was removed, but there was no evidence of any tension on the straps when we had the airplane suspended. You will need to secure the tail tie down ring to an aircraft jack stand or use an alternate arrangement, such as an auto jack stand on a platform like a work bench. Attach an engine hoist to the engine, and raise the airplane until the main landing gear are about four inches off the ground. The airplane will pivot on the tail tie-down ring. Use additional jacks under the horizontal stabilizer spar to stabilize the airplane laterally and keep the airplane from rolling. Once you have the airplane elevated and stable, finish unbolting and removing the main landing gear. Next, finish unbolting the main spar and rear spar from the fuselage. Now, drop the rear spar down below the E bulkhead and begin to slide the center section backwards until the main spar clears the brackets attached to the forward fuselage belly skin. Then; lower and remove the center section. You will need at least three people to do this.

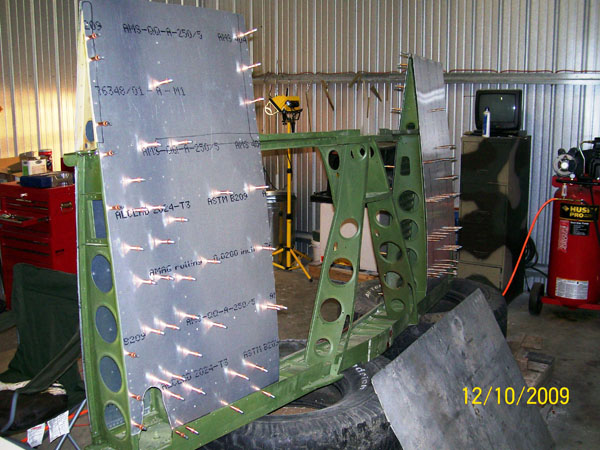
12. If you are going to make new skins for the replacement center section, you should pre-drill them prior to installation. Chances are, the skins from the center section you removed will not match the replacement. If you have a set of skins that match the holes in the new center section, you can use them as a pattern. Rough-cut a sheet of .020 aluminum sheet and lay it on a flat, drillable surface such as a work table covered with 1/2" plywood sheet. Use .040 Cleco fasteners outside the perimeter of the replacement skin to hold the rough skin sheet in place. Lay the old skin you are using as a pattern over the rough skin and align it. Starting near the middle of the old skin, drill a .040 hole through an existing hole into the new skin. Fasten to the plywood through both sheets using a .040 Cleco fastener. Work from the center out in a concentric pattern drilling holes and securing the skins with Clecos. By working from the center outward, you will ensure that the holes will remain lined up when you reach the edges.
If you don't have a pattern, the best way to mark a fresh sheet is to secure it to the new center section using a couple Cleco fasteners drilled to match existing holes, then have a helper hold the skin flush against the ribs of the center section while you shoot spray paint (primer) through the holes in the ribs. The paint will indicate where the holes should be drilled in the new sheet. You may need to do this several times to be accurate, one section at a time-- spray, drill, Cleco, spray, drill, Cleco some more. Always work from the middle out toward the edges!

| << previous | next >> |