
Servicing the main landing gear in an 415 Ercoupe
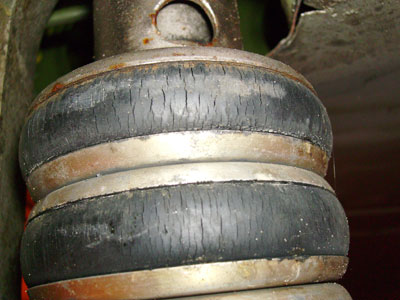
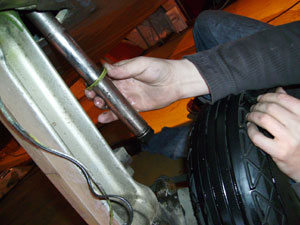
If your rubber disks (pucks) look like these here, it's time for a change.

With 4 inches in compressed state, it's not the worst performer, but not good either.
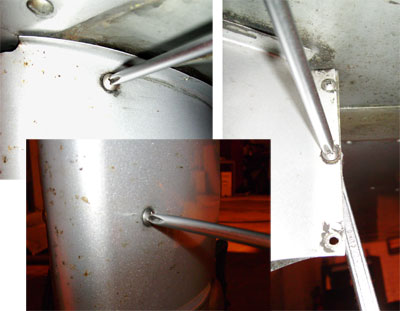
First remove the fairing.

The landing light needs to be taken out of the fairing before you attempt to remove the whole fairing. The wires contact inside the lamp.
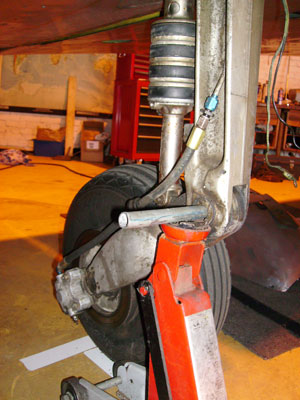
Jack the gear with an automobile 2 ton jack and a piece of pipe that you put through the knee joint.
Remove the bolt at the bottom of the strut. Then swing the whole strut assembly down and back.
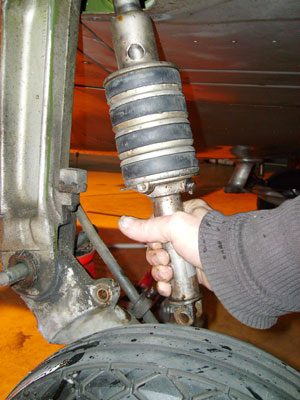
If yours is fitted with a spacer, remove the spacer that is installed above the oleo unit. The upper part of the oleo, the piston stays on the plane. It is not easy to reach the upper bolt here and there is no need to remove the piston as long as it appears to be serviceable.
Remove the outer shaft together with the whole donut assembly, by sliding it down, while the piston inside remains attached to the plane at its top. Then look at the bottom of the piston to determine whether you have the cup or o-ring.
Also examine the little hole in the center of the bottom of the piston, to be sure that it has not become clogged by rust or crud.
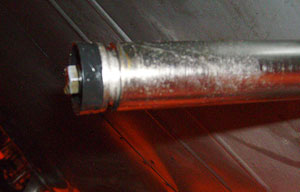
The picture here shows a cup fitted on the bottom of the piston - the O-ring sits just above in the groove on the strut's end. The cup is screwed on to the bottom of the piston with a bolt that has an orifice (hole) drilled into it - it's part of the conversion kit.(Cup is 1 1/8 inch brake cylinder cups) Check the cup or O-ring for deterioration. These are MS28775-212 HYDRAULIC PACKING O-RING Note that the cup is serviced with brake fluid and the O-ring with mineral hydraulic oil (automatic transmission oil TYPE-A works here too).
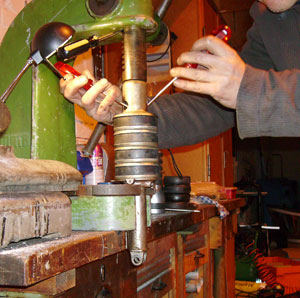
When taking apart the body with the rubber disks, one has to compress the unit in order to get the snap ring out and in.
After removing the snap ring , the whole assembly is apart and one can take the rubber disks out like on a child's toy.

The new rubbers need to be glued into the aluminum washers, preferably right before assembly to assure proper fit, and then compress again, hassle with the circuit clip and install in reverse order. When you have determined the proper fluid to use, according to whether your plane has the cup or o-ring seal, fill the strut up to the level of the filler port, as per the Service Manual.
Hartmut
Note: The clevis pins AN27-25 that are used for fastening the oleo struts are not being produced anymore. As per David Vernon the replacement bolts are AN7-16.
Here is his message:"
I am carrying out a complete overhaul of my Alon A2A (#B253) and replacing all the bolts, screws and bits that I can. On removing the Bellville spring units I decided to replace the upper and lower attaching bolts, Clevis Pins they are listed as AN27-25 and they are a 7/16th bolt. I tried to get these four bolts from my local supplier in the UK but he could not obtain them. I then ordered them from Univair by FAX and they sent four bolts which they said were the replacement ones as AN27-25 were no longer available.
The replacements were listed as AN7-16. DAVID VERNON
"
From William R. Bayne:
(SPRING ASSEMBLY P/N PCHF-121) (as furnished by Forney as FMK-9) Eligible for installation on Aircraft Certificated under under Type Certificates 718 (Models 415C & CD) and 787 (Models 415D, E, G, F1 and F1A). (Serial 813 and higher)
INSTALLATION INSTRUCTIONS BELLEVILLE SPRING CLUSTERS
After removing the Shock Strut Cylinder from the ship, remove with a pair of screw drivers the retaining ring. After removing the pressure cap, remove the Rubber Buns and Aluminum cups. After lightly coating the cylinder on the outside with grease, install 7 Belleville Clusters in place of the Rubbers and Cups. Replace the pressure cap and retaining ring after shimming the bottom platform to the correct height. The top pressure cap should be snug against the retaining ring, but should give only light, or no pressure on it. With the ring replaced, the shock is easy to reinstall in the ship, using the new "O" ring (part 6227-17) on the piston and the proper oil in the cylinder.
Oleos in Ercoupes (et al) Serial No. 813 up were manufactured for sealing with an AN6227-17 O-ring and were filled with red hydraulic oil.
Since the oleos tend to wear fore-aft only, the cylinder elongates over time to become sufficiently oval that an O-ring can no longer seal properly. Skyport has long offered an STC-FAA-PMA Kit, SMK 61 to install the earlier cup seal as an alternative to the original O-ring. With this kit installed, the oleo must be filled with automobile brake fluid.
Whichever is fitted, it is recommended that the seal be replaced whenever the oleo is disassembled.
For anyone interested, the oleo snap ring (part number 415-33229-1, see Fig. 12, item 18, NOT clearly shown and perhaps no longer available from Univair or Skyport is/was a "Reliance Light External Ring for 1.250 shaft, .125 x .620 wire section, .250 gap, style #6 gap" from Eaton Mfg. Co., Massilon, OH.
Regards,
William R. Bayne
Special Tools for The Job
I ground a slot in a flat blade screw driver. The slot is the same width as the thickness of the snap ring. You wind up with a two tyned fork looking tool. Then heated the shank of the screwdriver red with a propane torch and put a bend in it so it looked somewhat like a small pry bar.
I use one to hold the first end in place (will not slip off the snap ring); used a friend to hold it there and I used a second one to work the ring into the groove from the other hole. Again it does not slip off. Works nicely. Less cussing.
Rich Blair
I have found the easiest way to install the snap ring, after replacing the doughnuts, is to put the snap ring in the sleeve, and set the sleeve on top of the tube assembly with the new doughnuts. Then set the whole thing in an arbor press (it just fits in a normal arbor press) and lever the press down to just expose the snap ring groove. Lock the arbor press in this position, and then using a pair of electrician size straight slot screw drivers, I start the snap ring at one of the holes in the sleeve assembly. Hold that end in the groove, and work around the sleeve assembly, first through the hole I am holding the end of the snap ring, and then as I get the snap ring in the groove, I finish pushing the snap ring in place through the opposite hole in the sleeve assembly.
It sounds difficult, but I have found that using the arbor press cuts the time to less than 5 minutes to put the entire assembly together. When you are finished, there should be enough pressure from the doughnuts, that you will not be able to rotate the sleeve assembly on the tube. If you can rotate the sleeve, you need put spacers under the doughnut stack until they create enough pressure so you cannot rotate the sleeve assembly (after the snap ring is installed) Good Luck. It really is easy once you do it with the arbor press.
Lynn